ESP32-C3 BSP Introduction
中文 | English
This document records the execution instruction of the BSP (board support package) for the ESP32-C3 development board.
The document is covered in two parts:
- Board Resources Introduction
- Quickly Get Started
Resources Introduction
We tested 2 development boards, it all works, but due to the different LED pins of the two development boards, so we'll need to select the corresponding development board in the menuconfig.
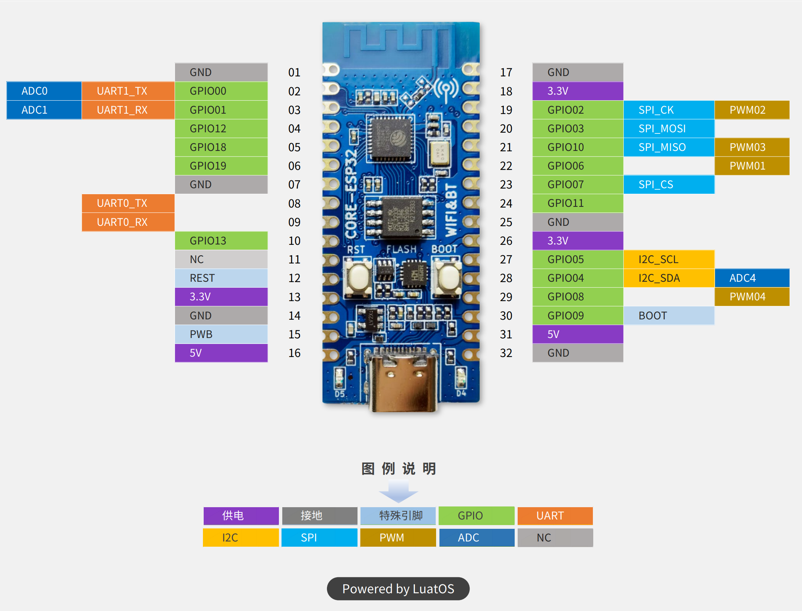
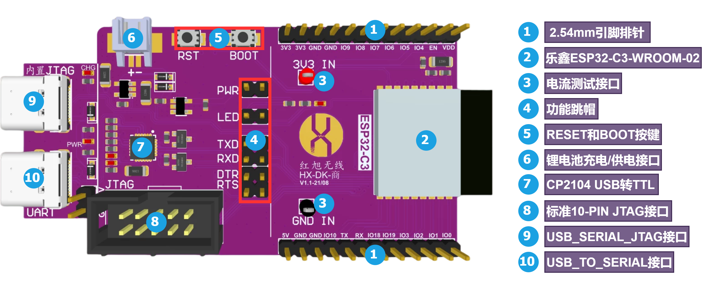
The mainly-used resources of LUATOS_ESP32C3 are shown as follows:
- MCU: esp32-c3,Main Frequency 160MHz, 407.22 CoreMark; 2.55 CoreMark/MHz
- Built-in Chip: 384KB ROM, 400KB SRAM
- Peripherals
- Red LED: 2, LED: D4 (IO12), D5(IO13)
- Button: 2, K1(BOOT) K2(RST)
- SPI FLASH: 4M
- Common-used interfaces: USB, UART, etc.
For more details about this board, please refer to Here.
Peripheral Condition
Each peripheral supporting condition for this BSP is as follows:
| On-board Peripherals | Support | Remark |
|---|---|---|
| GPIO | Support | |
| UART | Support | Using LUATOS_ESP32C3 development board requires connecting serial port to USB chip UART0_TX and UART0_RX (such as CP2102) |
| JTAG debug | Support | ESP32C3 usb-linked development boards can be debugged |
| WIFI | Partial support | There are currently some problems, such as rt_mq_recive cannot be used in ISR, etc. |
| BLE | Partially supported | There are currently some problems, such as NimBLE running errors after starting for a while |
| GDBStub | Support | You can use the GDB provided by ESP-IDF by turning on the BSP_ENABLE_GDBSTUB switch, which will enter GDB mode after a chip error |
| HWTIMER | Support | |
| Note: |
-
WIFI and BLE cannot be enabled at the same time. When using the BLE driver, be sure to turn off the
RT_USING_WIFIandLWIPswitches inmenuconfig. In addition, due to limited capabilities and lack of debugging equipment, there are problems with WIFI and BLE driver operation. If it can be solved, please contact timwcx@qq.com. -
The BLE driver only supports
NimBLEand is provided by thebluetoothcomponent inesp-idf. To use the BLE driver, please refer tobsp/ESP32_C3/packages/ESP-IDF-latest/examples/bluetooth/nimbleSample program, please note that theesp_timer_init()function must be called to initialize the clock driver before calling theNimBLErelated interface.
One way to run the BLE sample is to add the sample program to scons compilation and call the clock initialization program and sample program entry in bsp/ESP32_C3/main/main.c.
int main(void) {
   ...
#ifdef BSP_USING_BLE
     esp_timer_init(); //Call clock initialization program
     app_main(); //Call the BLE sample program entry
#endif
   ...
}
3、 Regarding the use of the GDBStub component, please see [ESP-IDF official documentation on GDBStub](https://docs.espressif.com/projects/esp-idf/zh_CN/latest/esp32c3/api-guides/tools/idf- monitor.html?#gdbstub-gdb), currently I have provided a debugging script esp32c3.gdb, the specific usage method is as follows.
wcx@tim ~/rt-thread/bsp/ESP32_C3 esp32 ± sudo riscv32-esp-elf-gdb # Enter gdb debugging
GNU gdb (crosstool-NG esp-2022r1-RC1) 9.2.90.20200913-git
Copyright (C) 2020 Free Software Foundation, Inc.
License GPLv3+: GNU GPL version 3 or later <http://gnu.org/licenses/gpl.html>
This is free software: you are free to change and redistribute it.
There is NO WARRANTY, to the extent permitted by law.
Type "show copying" and "show warranty" for details.
This GDB was configured as "--host=x86_64-build_pc-linux-gnu --target=riscv32-esp-elf".
Type "show configuration" for configuration details.
For bug reporting instructions, please see:
<http://www.gnu.org/software/gdb/bugs/>.
Find the GDB manual and other documentation resources online at:
<http://www.gnu.org/software/gdb/documentation/>.
For help, type "help".
Type "apropos word" to search for commands related to "word".
(gdb) source esp32c3.gpb # Load gdb script
0x3fca8c30 in __stack_start__ ()
(gdb)
Environment construction and compilation
-
Download the RISC-V toolchain:
wget https://github.com/espressif/crosstool-NG/releases/download/esp-2022r1-RC1/riscv32-esp-elf-gcc11_2_0-esp-2022r1-RC1-linux-amd64.tar.xz tar xf riscv32-esp-elf-gcc11_2_0-esp-2022r1-RC1-linux-amd64.tar.xz -
Configure the path of the toolchain:
Add the local path of the
RISC-Vtoolchain to theEXEC_PATHvariable in thertconfig.pyfile, or specify the path by setting theRTT_EXEC_PATHenvironment variable, for example:export RTT_EXEC_PATH=/opt/riscv32-esp-elf/bin -
Compile
Install esptool to convert ELF files to binary flash files:
pip install esptoolExecute the following command on the Linux platform to configure:
scons --menuconfigIt will automatically download env-related scripts to the
~/.envdirectory, and then execute:source ~/.env/env.sh cd bsp/ESP32_C3/ pkgs --updateIt will automatically download
RT-Thread-packages/esp-idfandRT-Thread-packages/FreeRTOS-Wrapper, after updating the software packages, executesconsto compile the board support package.If the compilation is successful,
rtthread.elf,rtthread.binfiles will be generated.
Download and program
In Windows, we can use flash supported by ESPRESSIF.
In Linux, we can use the esptool, which we have downloaded serval steps
Windows
-
Programming tool download
The current bsp test uses the Flash Download Tools tool to program without errors.
-
Programming tool configuration
Chip model selection
ESP32-C3Configure the binary file and offset address as follows:
binary file offset address bootloader.bin 0x0 partition-table.bin 0x8000 rtthread.bin 0x10000 Among them,
bootloader.binandpartition-table.bincan be found in thebsp/ESP32_C3/builtin_imgsfolder. After the configuration is completed, the screenshot is as follows, and then clickSTARTto download.
Linux
esptool.py -b 115200 --before default_reset --after hard_reset write_flash --flash_mode dio --flash_size detect --flash_freq 80m 0x0 path/to/your/bootloader.bin 0x08000 path/to/your/partition-table.bin 0x010000 path/to/your/rtthread.bin
if you have more than one ESP device connected, you can use -p to choose which device to use.
if the command failed, check whether user ave enough privilige to access the serials.
or we can check ESPRESSIF's Troubleshooting to get more help.
Notes
- The basic functions are now supported, but it needs more, welcome any contributions and feedback.
Maintainer:
- supperthomas email address: 78900636@qq.com
- tangzz98 email address: tangz98@outlook.com
Special thanks to chenyingchun0312 for providing support on the RISC-V part working.


